

某IDC客户要使用linode云主机部署zabbix监控业务,为了保证监控服务的可靠性提出高可用的需求,本文就来介绍zabbix_server的高可用部署过程。
| 角色 | ip | 描述 |
| zabbix-ha-1 | 192.168.176.190 | 私网互联IP |
| zabbix-ha-2 | 192.168.176.215 | 私网互联IP |
| VIP | 公网IP | zabbix_server业务地址 |
linode网络配置
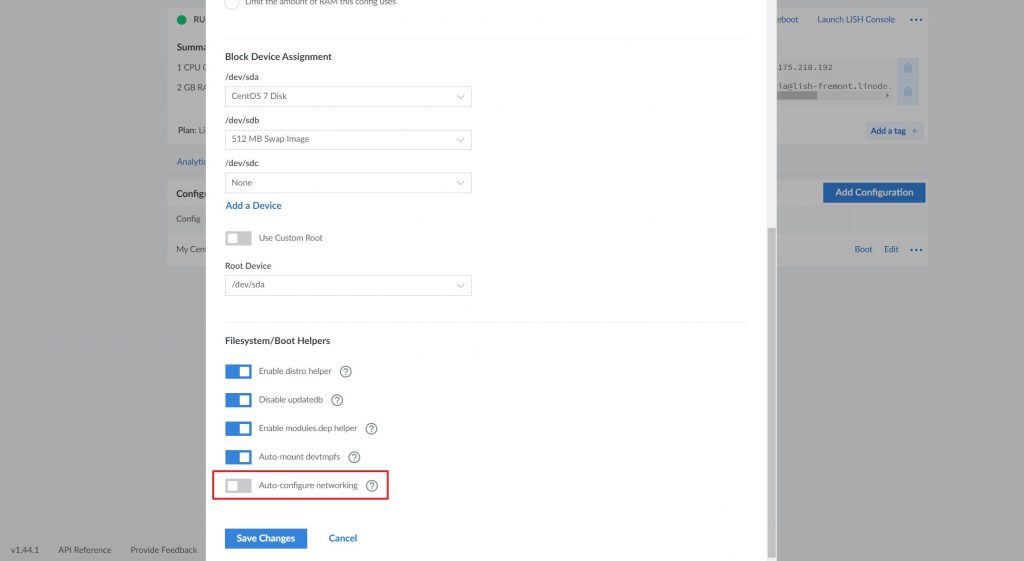
在同一数据中心linode允许云主机公网ip共享以支持高可用服务的部署,同时支持新增私网ip用于互联,需要注意的是一定要关闭linode的自动网络配置。

linode支持网络自动配置,在某些情况下非常方便,但在需要IP漂移的需求下,则一定要关闭,否则无法手动配置业务IP导致配置无法进行。
keepalive配置
在此之前,请保证zabbix_server已经安装完成,同时确保NTP服务正常启用,时间一定要同步准确!
yum -y install keepalived
systemctl enable keepalived
systemctl start keepalived
systemctl start firewalld.service
systemctl enable firewalld.service
firewall-cmd --add-protocol=vrrp --permanent
firewall-cmd --reload下面是网卡的配置文件,仅供参考:)
# Generated by Linode Network Helper
# Fri Jul  9 04:45:18 2021 UTC
#
# This file is automatically generated on each boot with your Linode's
# current network configuration. If you need to modify this file, please
# first disable the 'Auto-configure Networking' setting within your Linode's
# configuration profile:
#  - https://cloud.linode.com/linodes/595057/advanced
#
# For more information on Network Helper:
#  - https://www.linode.com/docs/platform/network-helper
#
# A backup of the previous config is at /etc/sysconfig/network-scripts/.ifcfg-eth0.linode-last
# A backup of the original config is at /etc/sysconfig/network-scripts/.ifcfg-eth0.linode-orig
#
# /etc/sysconfig/network-scripts/ifcfg-eth0

# For full descriptions of what these switches do,
# and what the interface's defaults are, see
# /usr/share/doc/initscripts-*/sysconfig.txt


DEVICE="eth0"
NAME="eth0"
ONBOOT="yes"

# "bootp" and "dhcp" are for dhcp, anything else
# is for a static configuration. "none" is given
# by sysconfig.txt so we're using it.
BOOTPROTO="none"


# Use hardware-based IPv6 addresses, no privacy extensions.
IPV6INIT="yes"
IPV6_ADDR_GEN_MODE="eui64"
IPV6_PRIVACY="no"


# Since we want a static configuration, we're specifying DNS
# addresses in this file for NetworkManager. "No" here tells
# NM to use them when BOOTPROTO!=dhcp.
# If NM is disabled the value will be yes
PEERDNS="no"

DOMAIN=members.linode.com


# resolvconf doesn't recognize more than 3 nameservers.

DNS1=173.255.241.5
DNS2=173.230.145.5
DNS3=74.207.242.5


# Sysconfig.txt says that PREFIX takes precedence over
# NETMASK when both are present. Since both aren't needed,
# we'll go with PREFIX since it seems to be preferred.


# IP assignment for eth0
IPADDR0=192.168.176.190
PREFIX0=17


[root@zabbix-ha-1 ~]#
愉快的开始做keepalived的配置,先创建2个bash脚本,用于检测业务和启停zabbix_server服务。
vim /etc/keepalived/script/zabbix.sh

#!/bin/bash
case $1 in
    start)
        /etc/init.d/zabbix_server start
    ;;
    stop)
        /etc/init.d/zabbix_server stop
    ;;
esac

vim /etc/keepalived/script/check.sh

#!/bin/bash

zabbix_server=`ps -C zabbix_server --no-header | wc -l`
mysqld=`ps -C mysqld --no-header | wc -l`

case $1 in
    zabbix_server)
        if [ $zabbix_server -gt 0 ];then
            exit 0
        else
            exit 1
        fi
    ;;
    mysqld)
        if [ $mysqld -gt 0 ];then
            exit 0
        else
            exit 1
        fi
    ;;
esac下面就是master服务器的keepalived的配置文件:
vim /etc/keepalived/keepalived.conf

! Configuration File for keepalived

global_defs {
    router_id zabbix-ha-1                                    #router_id 机器标识
    script_user root                                         #脚本执行用户
    enable_script_security                                   #如果脚本路径的任一部分对于非root用户来说,都具有可写权限,则不会以root身份运行脚本
}
vrrp_script chk_zabbix {
   script "/etc/keepalived/script/check.sh zabbix_server"    #脚本路径
   interval 3                                                #每3秒检测一次服务的运行状态
   weight 30                                                 #优先级变化幅度 优先级+30
   fall 2                                                    #尝试两次都成功才成功
   rise 2                                                    #尝试两次都失败才失败
}
vrrp_script chk_mysql {
   script "/etc/keepalived/script/check.sh mysqld"
   interval 3
   weight 20
   fall 2
   rise 2
}
vrrp_instance VI_1 {                                         #vrrp实例定义部分
    state MASTER                                             #设置lvs的状态,MASTER和BACKUP两种,必须大写
    interface eth0                                           #设置对外服务的接口
    virtual_router_id 100                                    #设置虚拟路由标示,这个标示是一个数字,同一个vrrp实例使用唯一标示
    priority 100                                             #定义优先级,数字越大优先级越高,在一个vrrp——instance下,master的优先级必须大于backup
    advert_int 1                                             #设定master与backup负载均衡器之间同步检查的时间间隔,单位是秒
    preempt delay 10                                         #抢占时间10秒,默认300秒
    unicast_src_ip 192.168.176.190                           #VRRP单播源地址,默认组播
    unicast_peer {                                           #VRRP单播目的地址,默认组播
       192.168.176.215
    }
    authentication {                                         #设置验证类型和密码
        auth_type PASS
        auth_pass 1111
    }
    track_interface {
        eth0                                                 #VIP漂移端口
    }
    virtual_ipaddress {
        66.175.218.192/24 dev eth0                           #VIP地址
    }
    virtual_routes {
        default via 66.175.218.1                             #VIP下放默认网关
    }
    track_script {
        chk_zabbix
    }
    track_script {
        chk_mysql
    }
notify_master "/etc/keepalived/script/zabbix.sh start"        #当当前节点角色为MASTER执行的脚本
notify_backup "/etc/keepalived/script/zabbix.sh stop"         #当当前节点角色为BACKUP执行的脚本
}
接下来就是backup节点的keepalived配置文件:
! Configuration File for keepalived

global_defs {
    router_id zabbix-ha-2
    script_user root
    enable_script_security
}
vrrp_script chk_zabbix {
    script "/etc/keepalived/script/check.sh zabbix_server"
    interval 3
    weight 5
    fall 2
    rise 2
}
vrrp_script chk_mysql {
    script "/etc/keepalived/script/check.sh mysqld"
    interval 3
    weight 45
    fall 2
    rise 2
}
vrrp_instance VI_1 {
    state BACKUP
    interface eth0
    virtual_router_id 100
    priority 90
    advert_int 1
    preempt delay 10
    unicast_src_ip 192.168.176.215
    unicast_peer {
       192.168.176.190
    }
    authentication {
        auth_type PASS
        auth_pass 1111
    }
    track_interface {
        eth0
    }
    virtual_ipaddress {
        66.175.218.192/24 dev eth0
    }
    virtual_routes {
        default via 66.175.218.1
    }
    track_script {
        chk_zabbix
    }
    track_script {
        chk_mysql
    }
notify_master "/etc/keepalived/script/zabbix.sh start"
notify_backup "/etc/keepalived/script/zabbix.sh stop"
}
最后设置keepalived自启动,同时firewall-cmd允许vrrp和其他必须协议通信:
yum -y install keepalived
systemctl start keepalived

systemctl start firewalld.service
systemctl enable firewalld.service
firewall-cmd --add-protocol=vrrp --permanent
firewall-cmd --add-service=https --permanent
firewall-cmd --add-service=http --permanent
firewall-cmd --reload

#MASTER ZABBIX_SERVER设置为自启动
#keepalived默认日志位置在/var/log/messages
MYSQL的主主同步
需要注意的是,为了避免zabbix_server双线操作数据库导致冲突,zabbix_server的配置文件中数据库主机需要填写成VIP地址。
开之前别忘记放开mysql的3306端口!
firewall-cmd --permanent --add-rich-rule='rule family="ipv4" source address="192.168.176.215/32" port protocol="tcp" port="3306" accept'
firewall-cmd --reload
zabbix-ha-1的my.cnf配置
[root@zabbix-ha-1 ~]# cat /etc/my.cnf
[client]
#password   = your_password
port        = 3306
socket      = /tmp/mysql.sock

[mysqld]
port        = 3306
socket      = /tmp/mysql.sock
datadir = /usr/local/mysql/var
skip-external-locking
key_buffer_size = 32M
max_allowed_packet = 1M
table_open_cache = 128
sort_buffer_size = 768K
net_buffer_length = 8K
read_buffer_size = 768K
read_rnd_buffer_size = 512K
myisam_sort_buffer_size = 8M
thread_cache_size = 16
query_cache_size = 16M
tmp_table_size = 32M
performance_schema_max_table_instances = 1000

explicit_defaults_for_timestamp = true
#skip-networking
max_connections = 500
max_connect_errors = 100
open_files_limit = 65535

log-bin=mysql-bin                                             #开启bin日志
binlog_format=mixed                                           #设置binlog格式为mixed
server-id   = 1                                               #保证每个服务器不一样
expire_logs_days = 10
early-plugin-load = ""

auto-increment-increment = 2                                  #步进值auto_imcrement。一般有n台主MySQL就填n
auto-increment-offset = 1                                     #起始值。一般填第n台主MySQL。此时为第一台主MySQL
sync_binlog = 1                                               #事务特性每1次事务提交
binlog-do-db = zabbix_server                                  #同步的据库名
binlog-ignore-db = mysql                                      #不同步数据库名
binlog-ignore-db = sys
binlog-ignore-db = performance_schema
binlog-ignore-db = information_schema
replicate-do-db = zabbix_server                               #需要复制的数据库
replicate-ignore-db=mysql                                     #不需要复制的数据库
replicate-ignore-db=sys
replicate-ignore-db=performance_schema
replicate-ignore-db=information_schema

default_storage_engine = InnoDB
innodb_file_per_table = 1
innodb_data_home_dir = /usr/local/mysql/var
innodb_data_file_path = ibdata1:10M:autoextend
innodb_log_group_home_dir = /usr/local/mysql/var
innodb_buffer_pool_size = 128M
innodb_log_file_size = 32M
innodb_log_buffer_size = 8M
innodb_flush_log_at_trx_commit = 1
innodb_lock_wait_timeout = 50

[mysqldump]
quick
max_allowed_packet = 16M

[mysql]
no-auto-rehash

[myisamchk]
key_buffer_size = 32M
sort_buffer_size = 768K
read_buffer_size = 768K
write_buffer_size = 2M

[mysqlhotcopy]
interactive-timeout
接下来是zabbix-ha-2的my.cnf配置
[client]
#password   = your_password
port        = 3306
socket      = /tmp/mysql.sock

[mysqld]
port        = 3306
socket      = /tmp/mysql.sock
datadir = /usr/local/mysql/var
skip-external-locking
key_buffer_size = 32M
max_allowed_packet = 1M
table_open_cache = 128
sort_buffer_size = 768K
net_buffer_length = 8K
read_buffer_size = 768K
read_rnd_buffer_size = 512K
myisam_sort_buffer_size = 8M
thread_cache_size = 16
query_cache_size = 16M
tmp_table_size = 32M
performance_schema_max_table_instances = 1000

explicit_defaults_for_timestamp = true
#skip-networking
max_connections = 500
max_connect_errors = 100
open_files_limit = 65535

log-bin=mysql-bin
binlog_format=mixed
server-id   = 2
expire_logs_days = 10
early-plugin-load = ""

auto-increment-increment = 2
auto-increment-offset = 2
sync_binlog = 1
binlog-do-db = zabbix_server
binlog-ignore-db = mysql
binlog-ignore-db = sys
binlog-ignore-db = performance_schema
binlog-ignore-db = information_schema
replicate-do-db = zabbix_server
replicate-ignore-db=mysql
replicate-ignore-db=sys
replicate-ignore-db=performance_schema
replicate-ignore-db=information_schema

default_storage_engine = InnoDB
innodb_file_per_table = 1
innodb_data_home_dir = /usr/local/mysql/var
innodb_data_file_path = ibdata1:10M:autoextend
innodb_log_group_home_dir = /usr/local/mysql/var
innodb_buffer_pool_size = 128M
innodb_log_file_size = 32M
innodb_log_buffer_size = 8M
innodb_flush_log_at_trx_commit = 1
innodb_lock_wait_timeout = 50

[mysqldump]
quick
max_allowed_packet = 16M

[mysql]
no-auto-rehash

[myisamchk]
key_buffer_size = 32M
sort_buffer_size = 768K
read_buffer_size = 768K
write_buffer_size = 2M

[mysqlhotcopy]
interactive-timeout
新建备份用户,需要特别注意的是,在两个数据库分别导入完zabbix_server的sql语句后,不要启动zabbix_server服务,避免主键冲突无法完成同步!
#两台是访问主机允许是相互的

mysql> GRANT REPLICATION SLAVE ON *.* TO 'dbsync'@'192.168.197.190' IDENTIFIED BY 'zabbix';
mysql> FLUSH PRIVILEGES;

mysql> GRANT REPLICATION SLAVE ON *.* TO 'dbsync'@'192.168.197.215' IDENTIFIED BY 'zabbix';
mysql> FLUSH PRIVILEGES;
查看二进制日志名称和位置
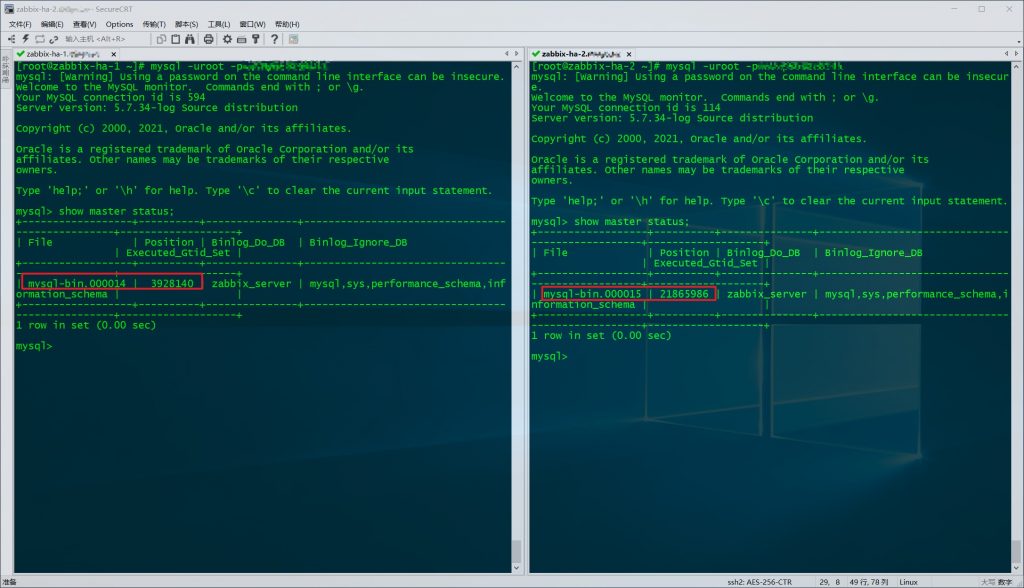
开始构建zabbix-ha-1到zabbix-ha-2的主从同步,在zabbix-ha-2上执行:
mysql> CHANGE MASTER TO
    -> MASTER_HOST='192.168.170.190',
    -> MASTER_USER='dbsync',
    -> MASTER_PASSWORD='zabbix',
    -> MASTER_LOG_FILE='mysql-bin.000014',
    -> MASTER_LOG_POS=3928140;
Query OK, 0 rows affected, 2 warnings (0.38 sec)

mysql> START SLAVE;

mysql> SHOW SLAVE STATUS\G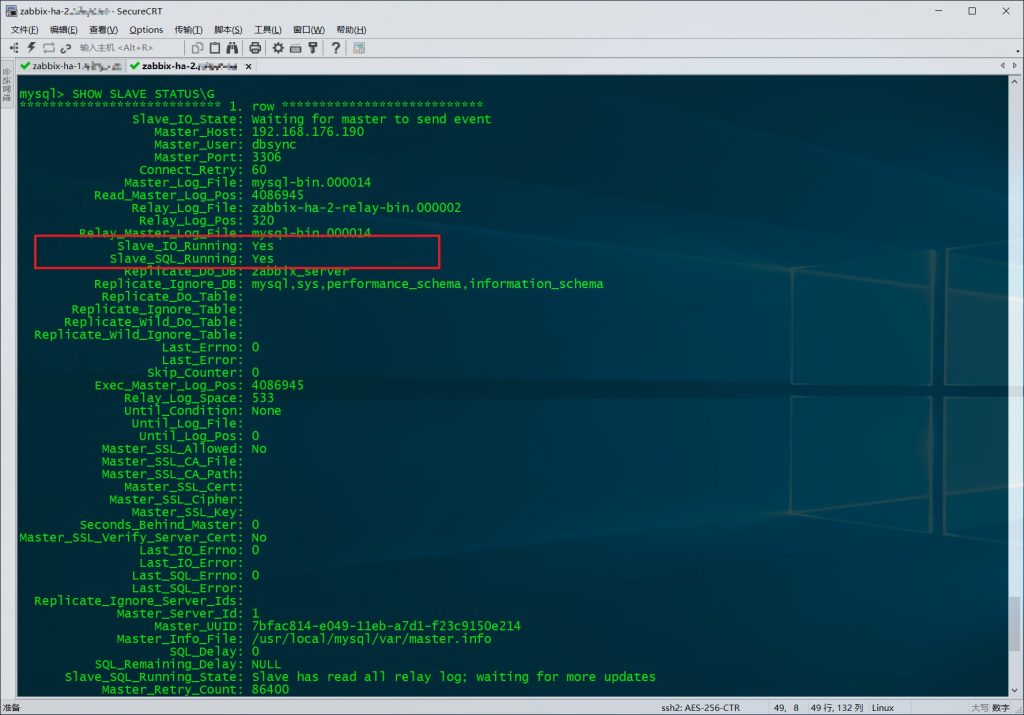
再做一次zabbix-server02到zabbix-server01的主从同步即完成了主主同步,以下操作都在zabbix-ha-1上执行:
CHANGE MASTER TO
    MASTER_HOST='192.168.176.215',
    MASTER_USER='dbsync',
    MASTER_PASSWORD='zabbix',
    MASTER_LOG_FILE='mysql-bin.000015',
    MASTER_LOG_POS=43819972;

START SLAVE;

SHOW SLAVE STATUS\G
然后再在zabbix-ha-1上看mysql的同步情况,至此mysql的主主同步配置完成。
配置文件的同步
由于zabbix-server两台主机配置文件需实时同步,所以通过定时任务方式不可行,采用inotify工具对同步数据目录信息的监控,结合rsync完成对数据信息的实时同步。
详细可以参考:https://blog.51cto.com/u_3241766/2137303
参考链接
https://blog.51cto.com/u_3241766/2137303
https://www.cnblogs.com/l-hh/p/12530882.html
https://blog.csdn.net/m0_37477061/article/details/83687018
https://blog.csdn.net/weixin_42758707/article/details/98762998
https://www.cnblogs.com/struggle-1216/p/12098241.html
https://www.cnblogs.com/bugutian/p/13613673.html
https://www.cnblogs.com/rexcheny/p/10778567.html
https://www.cnblogs.com/wswind/p/13792585.html